Cybersecurity is more critical than ever. Organizations, developers, and hobbyists constantly seek tools to identify vulnerabilities in web applications and networks. But what if you could create a lightweight, customizable vulnerability scanner yourself? Enter VulnScanner—a Python-based tool designed to detect common web and network vulnerabilities and generate detailed HTML reports.
In this blog post, we’ll walk you through the features and functionality of Vulnerability Scanner, explaining how it works and how you can build on it.
Overview of VulnerabilityScanner
The VulnerabilityScanner is a Python script that combines network and web vulnerability detection. It performs tasks like:
- Scanning for open ports on a target system.
- Detecting missing HTTP security headers.
- Testing for SQL Injection vulnerabilities.
- Checking for Cross-Site Scripting (XSS) vulnerabilities.
It then consolidates all findings into a professionally styled HTML report.
Key Features
- Port Scanning: Uses
nmapto identify open ports on a target. - Web Vulnerability Checks: Tests for missing HTTP security headers, SQL Injection, and XSS.
- HTML Report: Generates a detailed, timestamped report summarizing the results.
- Customizability: Add new checks and enhance functionality as needed.
How It Works
Let’s dive into the key components of the code to understand its structure and functionality.
Step 1. Importing Libraries
The script begins by importing the necessary libraries. These include standard Python modules like os, datetime, and json, as well as third-party tools like nmap, requests, and BeautifulSoup
import os
import json
import nmap
import requests
from bs4 import BeautifulSoup
from datetime import datetime
from urllib.parse import urlparse
from colorama import Fore, Style, initosandjson: For system-level operations and handling data.nmap: A Python wrapper for the Nmap tool to scan ports.requests: To make HTTP requests.BeautifulSoup: To create an HTML report summarizing vulnerabilities.datetime: To add timestamps to reports.urlparse: To validate and parse URLs.colorama: For colorful terminal output to make results more readable.
Color Initialization:
init(autoreset=True)This ensures that colors reset after each print statement, preventing unwanted formatting in terminal outputs.
Step 2. The VulnerabilityScanner Class
This class organizes all the functionality of the scanner into methods and attributes.
Constructor (__init__)
class VulnerabilityScanner:
    def __init__(self, target):
        parsed = urlparse(target)
        if not parsed.scheme:
            self.target = f"http://{target}"
        else:
            self.target = target
        self.vulnerabilities = []
        self.vulnerability_descriptions = {
            "Open Port": "An open port may expose the system to unauthorized access or exploits.",
            "Missing Security Header": "Missing HTTP security headers can leave the application vulnerable to attacks like XSS or clickjacking.",
            "SQL Injection": "SQL injection vulnerabilities can allow attackers to manipulate a database by injecting malicious queries.",
            "Cross-Site Scripting (XSS)": "XSS vulnerabilities can enable attackers to inject malicious scripts into web pages viewed by other users."
        }
What’s Happening?
- Target Validation: Ensures the input
targetincludeshttp://orhttps://. If not, it prependshttp://. - Attributes:
self.vulnerabilities: Stores all detected issues.self.vulnerability_descriptions: A dictionary explaining each vulnerability type for use in the report.
Banner Display
def banner(self):
    print(Fore.CYAN + Style.BRIGHT + r"""
 __      __    _          _____
 \ \    / /   | |        / ____|
  \ \  / /   _| |_ __   | (___   ___ __ _ _ __  _ __   ___ _ __
   \ \/ / | | | | '_ \   \___ \ / __/ _` | '_ \| '_ \ / _ \ '__|
    \  /| |_| | | | | |  ____) | (_| (_| | | | | | | |  __/ |
     \/  \__,_|_|_| |_| |_____/ \___\__,_|_| |_|_| |_|\___|_|


  Vulnerability Scanner v1.0
    """)
Displays a clean ASCII banner using colorama for styling. This makes the tool visually engaging for users.
Step 3. Scanning Ports: scan_ports
Uses nmap to identify open ports on the target.
def scan_ports(self):
    print(Fore.YELLOW + "[+] Scanning for open ports...")
    nm = nmap.PortScanner()
    nm.scan(self.target, '1-65535', '-T4')
    for host in nm.all_hosts():
        for proto in nm[host].all_protocols():
            ports = nm[host][proto].keys()
            for port in ports:
                state = nm[host][proto][port]['state']
                self.vulnerabilities.append({
                    "type": "Open Port",
                    "details": f"Port {port}/{proto} is {state}",
                })
What’s Happening?
- Nmap Scanning: Uses
nmapto scan all 65,535 ports (1-65535) with-T4(faster scan timing). - Results Parsing:
- For each host and protocol, retrieves open ports and their states.
- Logs findings as vulnerabilities.
Example Output:
[+] Scanning for open ports...
Port 80/tcp is open
Step 4: Checking HTTP Headers: check_http_headers
Checks for missing security headers like X-Content-Type-Options and Content-Security-Policy.
def check_http_headers(self):
    print(Fore.YELLOW + "[+] Checking HTTP headers...")
    try:
        response = requests.get(self.target)
        headers = response.headers
        if 'X-Content-Type-Options' not in headers:
            self.vulnerabilities.append({
                "type": "Missing Security Header",
                "details": "X-Content-Type-Options header is missing.",
            })
        if 'Content-Security-Policy' not in headers:
            self.vulnerabilities.append({
                "type": "Missing Security Header",
                "details": "Content-Security-Policy header is missing.",
            })
    except Exception as e:
        print(Fore.RED + f"[-] Error checking HTTP headers: {e}")
What’s Happening?
- Sending Request: Makes an HTTP GET request to the target.
- Header Validation:
- Checks if security headers (
X-Content-Type-Options,Content-Security-Policy) are present. - Logs missing headers as vulnerabilities.
- Checks if security headers (
- Error Handling: Catches and displays any exceptions during the request.
Example Output:
[+] Checking HTTP headers...
[+] Missing Security Header: X-Content-Type-Options
5. SQL Injection: check_sql_injection
def check_sql_injection(self):
    print(Fore.YELLOW + "[+] Checking for SQL Injection vulnerabilities...")
    payloads = ["' OR '1'='1", "' OR '1'='1' --", "' OR 1=1 --"]
    for payload in payloads:
        try:
            response = requests.get(f"{self.target}/?id={payload}")
            if "sql" in response.text.lower() or "syntax" in response.text.lower():
                self.vulnerabilities.append({
                    "type": "SQL Injection",
                    "details": f"Potential SQL Injection vulnerability detected with payload: {payload}",
                })
        except Exception as e:
            print(Fore.RED + f"[-] Error checking for SQL Injection: {e}")
What’s Happening?
- SQL Payloads: Tests common SQL Injection payloads like:
' OR '1'='1' OR 1=1 --
- Response Analysis:
- Checks if the response contains SQL-related errors (e.g., syntax errors).
- Logs potential vulnerabilities.
Step 6. Cross-Site Scripting (XSS): check_xss
def check_xss(self):
    print(Fore.YELLOW + "[+] Checking for XSS vulnerabilities...")
    payloads = ["<script>alert('XSS')</script>", "<img src='x' onerror='alert(1)'>"]
    for payload in payloads:
        try:
            response = requests.get(f"{self.target}/?q={payload}")
            if payload in response.text:
                self.vulnerabilities.append({
                    "type": "Cross-Site Scripting (XSS)",
                    "details": f"Potential XSS vulnerability detected with payload: {payload}",
                })
        except Exception as e:
            print(Fore.RED + f"[-] Error checking for XSS: {e}")
What’s Happening?
- Payload Injection: Tests common XSS payloads like:
<script>alert('XSS')</script><img src='x' onerror='alert(1)'>
- Response Reflection:
- Checks if the payload is reflected in the server’s response.
- Logs potential XSS vulnerabilities.
Step 7. Generating an HTML Report: generate_html_report
def generate_html_report(self):
    print(Fore.GREEN + "[+] Generating HTML report...")
    now = datetime.now().strftime("%Y-%m-%d_%H-%M-%S")
    report_filename = f"vulnerability_report_{now}.html"

    html = BeautifulSoup("", "html.parser")
    html.append(html.new_tag("html"))
    html.html.append(html.new_tag("head"))
    html.html.head.append(html.new_tag("title"))
    html.html.head.title.string = "Vulnerability Report"

    body = html.new_tag("body")
    html.html.append(body)

    header = html.new_tag("h1")
    header.string = "Vulnerability Report"
    body.append(header)

    seen_vulnerabilities = set()
    for vuln in self.vulnerabilities:
        if vuln["type"] not in seen_vulnerabilities:
            seen_vulnerabilities.add(vuln["type"])

            vuln_div = html.new_tag("div")
            vuln_type = html.new_tag("h3")
            vuln_type.string = vuln["type"]
            vuln_div.append(vuln_type)

            vuln_description = html.new_tag("p")
            vuln_description.string = self.vulnerability_descriptions.get(vuln["type"], "No description available.")
            vuln_div.append(vuln_description)

            body.append(vuln_div)

        vuln_details = html.new_tag("p")
        vuln_details.string = vuln["details"]
        body.append(vuln_details)

    with open(report_filename, "w") as file:
        file.write(str(html))
    print(Fore.GREEN + f"[+] Report saved as {report_filename}")
What’s Happening?
- HTML Structure: Builds a simple HTML document using
BeautifulSoup.- Adds a title and header for clarity.
- Vulnerability Summaries:
- Ensures each vulnerability type is listed only once.
- Appends detailed logs for each finding.
- Save to File: Saves the report with a timestamped filename.
Example Output:
[+] Generating HTML report...
[+] Report saved as vulnerability_report_2025-01-12_15-30-00.html
8. Execution Flow: run
The run method orchestrates all the functionality of the script:
def run(self):
    self.banner()
    self.scan_ports()
    self.check_http_headers()
    self.check_sql_injection()
    self.check_xss()
self.generate_html_report()- Banner: Displays the ASCII banner.
- Scanning: Executes each vulnerability detection method sequentially.
- Report: Calls the
generate_html_reportmethod to summarize findings.
We are now finished! Go ahead save the file and name it as vulnscanner.py and read below how to make sure you have the required dependencies installed.
9. Running the Script
Installation
Install required dependencies:
pip install python-nmap requests beautifulsoup4 coloramaNote: You will have to install Nmap from their website alongside the Python dependency in order to be able to use the script. Follow the installation as normal.
Running
First open your command prompt/terminal and navigate to where you just saved the python script. For simplicity sake, I have saved it to my desktop.
To navigate between directories use cd Insert Directory name (Note: directories are case sensitive so make sure you type it exact)
Execute the script: python vulnscanner.py
Enter the target when prompted:

For demonstration purposes, I will be using VulnWeb for this, they intentionally host vulnerable websites for enthusiasts, students, and cybersecurity professionals to test their skills and tools.
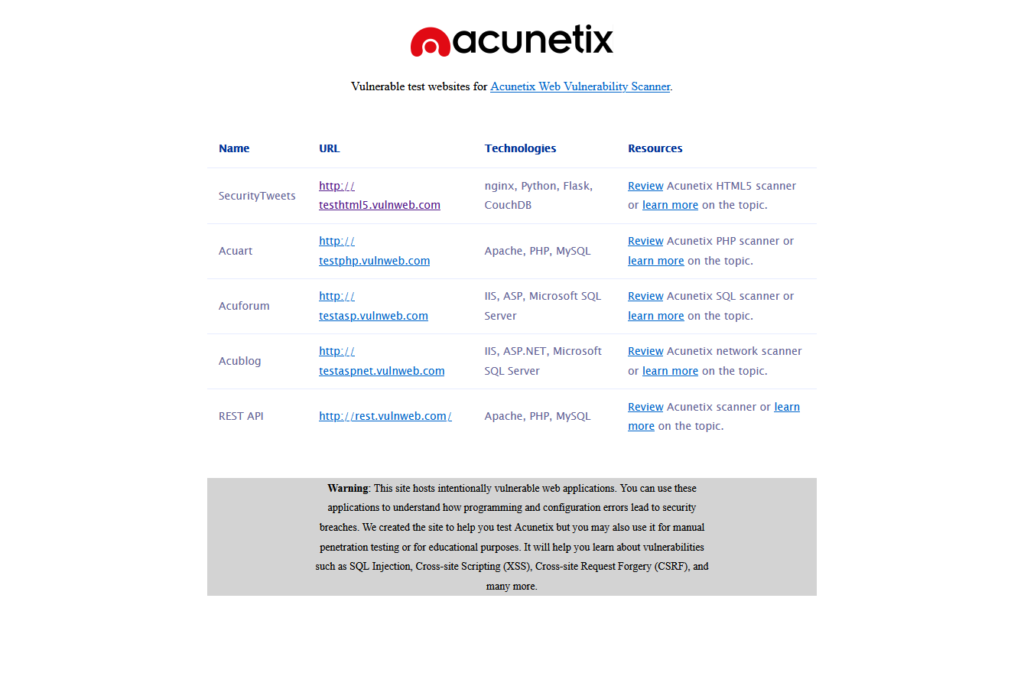
For this example, we will be copying and pasting the Acublog link into our command prompt/terminal and hit enter.
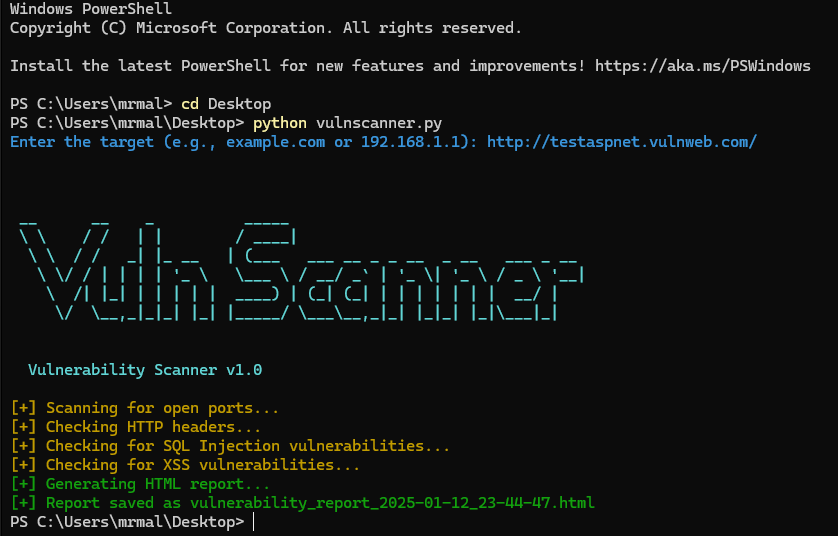
Once it generates the HTML report, it will save it in the same directory as the script allowing us quick access to view.
Open the file, and select your browser. This is a local HTML file so its not connecting to the internet to display anything, which can be useful later on.

As we can see in this Vulnerability Report, the Acublog website is vulnerable to cross-site scripting also known as (XSS).
For good measure, we will test one more website from VulnWeb to make sure our script is also checking for SQL Injection Vulnerabilities.
The website we will be using for this is going to be Acuart, so head back over to VulnWeb, and copy and paste the link into command prompt/terminal then hit Enter.
The report will generate like last time, so open up the file directory where the script is saved, and we will find the latest Vulnerability Report.
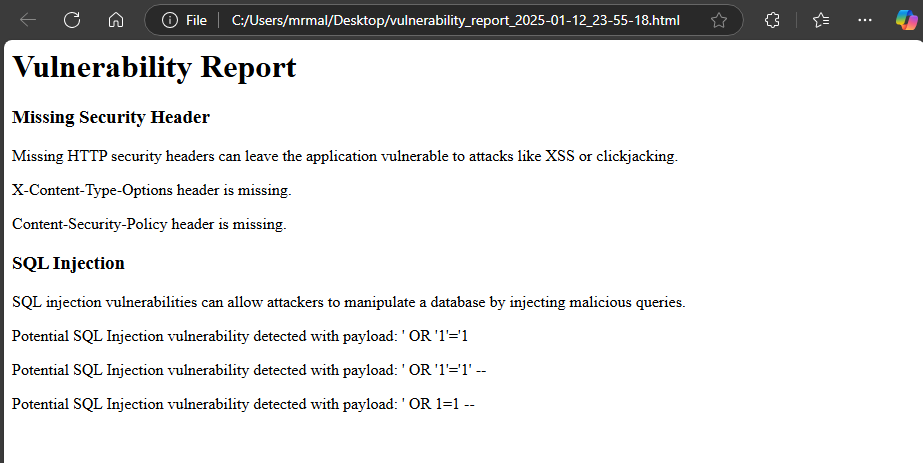
As we can see above, there is Missing Security Headers which leave the site vulnerable to XSS. With that being said, it also shows there is SQL Injection vulnerabilities where an attacker can manipulate by injecting various malicious queries.
And that is all for today! In the next blog post, we will discuss how we can take basic measures to prevent against suck attacks and secure our websites from vulnerabilities like this.
